
How to change button size in WordPress
![]() by Fabio Peters
by Fabio Peters
In the ever-evolving world of web design, every detail, no matter how seemingly small, plays a significant role in shaping the user experience. The call-to-action button is the gateway to interactivity on your WordPress website.
You’ve carefully crafted your content, chosen the perfect images, and fine-tuned your layout, but have you ever paused to consider the impact of button size on your visitors’ interaction with your site?
Buttons are the digital handshakes that beckon users to take action—whether it’s signing up for a newsletter, making a purchase, or exploring more of your content. The size of these virtual handshakes matters more than you might think. It can be the difference between a user confidently clicking through or frustratingly fumbling around.
So, join us on a journey through the art and science of changing button size in WordPress. In this exploration, we’ll unravel the mysteries of why button size matters, the tools and techniques at your disposal, and the best practices that will elevate your website’s design and user experience. Get ready to make those buttons on your WordPress site not just bigger but better, as we embark on a quest to master the art of button size customization.
Why Are Buttons Important in Website Design?
When it comes to web design, every element on a webpage plays a crucial role in shaping the overall user experience. One such element that often goes underestimated is the size of buttons. Buttons are the interactive components of a website, and their size has a significant impact on how users navigate and interact with the site. Understanding the importance of button size in web design is essential for creating a user-friendly and visually appealing website.
Visibility and Clickability: Button size directly affects its visibility and clickability. Larger buttons are easier for users to spot, making it more likely that they will click on them. This is particularly important for call-to-action (CTA) buttons, such as “Sign Up” or “Buy Now,” as they are designed to prompt user actions. A well-sized button draws attention and encourages engagement.
Touch-Friendly Design: With the increasing use of mobile devices, responsive web design has become critical. Larger buttons are more touch-friendly, which is crucial for mobile users who interact with websites through touchscreen interfaces. Small buttons can be frustrating to tap accurately, leading to a poor user experience.
Aesthetics and Balance: Button size also plays a role in the aesthetics of a website. Buttons that are too small can look out of place or get lost amidst other design elements. On the other hand, buttons that are too large can overwhelm the design and disrupt the visual balance of the page. Finding the right button size ensures that they seamlessly integrate with the overall design.
User Accessibility: Web accessibility is a key consideration in modern web design. Larger buttons are more accessible to users with disabilities, particularly those with motor impairments. Accessibility guidelines, such as the Web Content Accessibility Guidelines (WCAG), recommend providing sufficient button size and spacing to accommodate users who rely on assistive technologies like screen readers or voice commands.
Branding and Consistency: Button size can also be a part of branding and design consistency. Establishing a consistent button size across your website creates a cohesive look and reinforces your brand identity. Users become familiar with the size and appearance of buttons, which can improve their overall experience and usability.
Mobile Responsiveness: In the era of responsive web design, buttons must adapt to different screen sizes. This means that button size considerations extend beyond desktop users. Designing buttons that scale appropriately for various screen sizes ensures a consistent and user-friendly experience across devices.
Button size is not a minor detail in web design; it’s a critical aspect that affects usability, accessibility, aesthetics, and overall user satisfaction. Careful consideration of button size, along with its placement and styling, can significantly enhance the effectiveness and appeal of your website. It’s essential for web designers and developers to strike the right balance between aesthetics and functionality when determining the size of buttons on a webpage.
How to customize buttons in WordPress
Customizing button size in WordPress is an important aspect of web design that allows you to tailor your website’s appearance and functionality to meet your specific needs and preferences.
Here, we’ll delve into a step-by-step guide for customizing button size in WordPress:
- Access the WordPress Admin Dashboard: To begin customizing button size, log in to your WordPress admin dashboard. This is where you’ll make all the necessary changes.
- Navigate to the Page/Post Editor: Depending on where you want to customize button size (e.g., on a specific page or post), go to the editor for that page or post.
- Insert or Edit a Button: If you’re creating a new button, use the built-in block editor to add a button block. If you want to edit an existing button, simply click on it to select it.
- Use the Block Settings: Once you have a button block selected, you can access the block settings on the right-hand side or in a toolbar at the top, depending on your editor version.
- Adjust Button Size: In the block settings, look for options related to button size or dimensions. These settings might include options like “Width,” “Height,” or “Button Size.” Use these settings to adjust the size of your button.
- Preview Your Changes: Before you save your changes, it’s a good practice to preview your button size adjustments. This will give you an idea of how the button will look on your website.
- Save or Update Your Page/Post: Once you’re satisfied with the button size, save or update your page or post. Your customized button size will now be reflected on the live version of your website.
Additional Methods for Customizing Button Size in WordPress
While the above steps focus on using the default block editor to customize button size, there are alternative methods and tools you can use for more advanced customization:
Custom CSS: For more precise control over button size, you can use custom CSS code. This method allows you to target specific buttons or button classes and adjust their size according to your design specifications.
WordPress Theme Customizer: Some WordPress themes offer built-in customization options for button styles and sizes. Check your theme’s customization settings to see if there are options for adjusting button sizes.

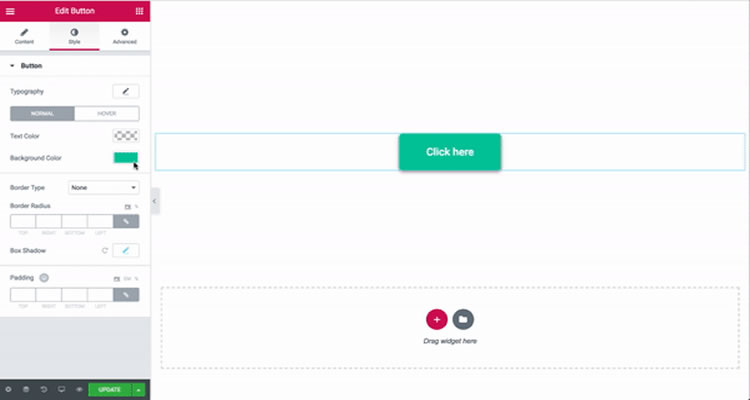
Page Builder Plugins: If you use a page builder plugin like Elementor, Beaver Builder, or Divi, you can easily customize button size through their drag-and-drop interfaces. These plugins often provide extensive design options, including button size adjustments.
Button Plugins: Consider using a WordPress button plugin that offers advanced styling and customization features. These plugins can simplify the process of creating and customizing buttons, including adjusting their size.
Customizing button size in WordPress can be achieved through the native block editor or various plugins and tools. The method you choose depends on your specific design requirements and familiarity with WordPress customization options. Regardless of your approach, it’s important to maintain a visually pleasing and user-friendly design while ensuring that buttons align with your website’s overall style and branding.
How do I change the size of a button in CSS?
Utilizing CSS (Cascading Style Sheets) for precise button size adjustments in WordPress allows you to have fine-grained control over the appearance of your buttons.
Here’s an expanded explanation of how to use CSS for this purpose:
Identify the Button Class or ID: To customize the size of a specific button or group of buttons, you’ll first need to identify the HTML class or ID associated with them. This can usually be found in your WordPress theme’s code or through web inspection tools like browser developer tools.
Access the WordPress Customizer: Log in to your WordPress admin dashboard and navigate to the “Customizer.” Depending on your theme, this option may be located under “Appearance” or “Customize.”
Access Additional CSS: In the Customizer, you’ll often find an option called “Additional CSS” or “Custom CSS.” Click on it to open the CSS editor.
Write CSS Code for Button Size: To adjust the button size, you’ll need to write CSS code that targets the specific button class or ID you identified earlier. For example, if you want to target a button with the class “my-button,” your CSS code might look like this:
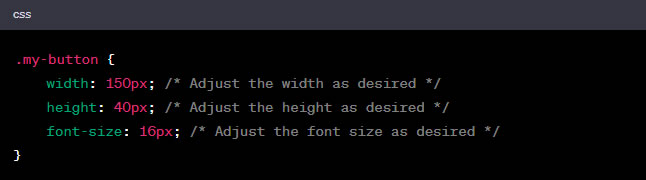
In the above code, we’re specifying the width, height, and font size of the button. You can adjust these values to achieve the desired button size.
Preview Your Changes: After writing your CSS code, click the “Publish” or “Save” button in the Customizer to save your changes. Then, preview your website to see how the button size adjustments look in action.
Refine and Test: It’s essential to test your button size adjustments across different devices and screen sizes to ensure responsiveness. Use your browser’s developer tools to simulate various screen sizes and check that the button sizes remain visually appealing and functional.
Additional Tips for CSS Button Customization:
Use Percentage Values: Instead of fixed pixel values, consider using percentage values for width and height to create responsive buttons that adapt to different screen sizes.
Hover Effects: You can also use CSS to define how button size changes when a user hovers over it. This can add interactivity and improve the user experience.
Button Margins and Padding: Adjusting margins and padding around the button can also affect its overall size and spacing within a design. Customize these properties as needed.
Browser Compatibility: Be mindful of browser compatibility when using CSS for button customization. Test your changes in multiple browsers to ensure consistent rendering.
Backup Your CSS: Before making significant CSS adjustments, consider saving a backup of your previous CSS code so that you can easily revert changes if needed.
Utilizing CSS for precise button size adjustments in WordPress provides you with the flexibility to fine-tune your website’s design according to your specific requirements. It’s a powerful method for achieving a customized and visually appealing appearance for your buttons while maintaining control over their responsiveness and usability.
Are there plugins to reduce the size of a button in WordPress?
Exploring WordPress button plugins for size control is a valuable approach for users who want to simplify the process of adjusting button sizes on their websites.
These plugins offer a user-friendly interface and various customization options, making it easier for both beginners and experienced developers to achieve the desired button size.
Here’s an expanded explanation of this approach:
Understand the Need for Button Plugins: WordPress button plugins are designed to enhance the functionality and appearance of buttons on your website. While WordPress provides basic button block features in its editor, plugins offer more advanced customization options, including size control.
Choose the Right Button Plugin: Begin by selecting a button plugin that suits your needs. Popular options include “MaxButtons,” “Buttonizer,” “WP Button Pro,” and “Shortcodes Ultimate,” among others. You can find and install these plugins from the WordPress Plugin Repository.
Install and Activate the Plugin: Once you’ve chosen a plugin, install and activate it through your WordPress admin dashboard. Follow the plugin’s specific installation instructions, which often involve a few clicks.
Create or Edit Buttons: After activation, you can start creating or editing buttons using the plugin’s interface. Typically, these plugins provide a button builder or editor that allows you to customize various button parameters, including size.
Customize Button Size: Most button plugins offer an intuitive way to adjust button size. You can usually do this by entering specific values for width and height or by using a visual drag-and-drop editor to resize buttons. These plugins may also provide pre-defined button size presets to choose from.
Style and Design Options: Button plugins often come with a wide range of style and design options. You can customize not only the size but also the color, typography, hover effects, and more to match your website’s overall design.
Add Buttons to Your Content: Once you’ve created and customized your buttons, you can easily add them to your posts, pages, or other content using shortcode or a block provided by the plugin. This makes it convenient to integrate buttons seamlessly into your website.
Responsive Design: Many button plugins are designed to be responsive, ensuring that your buttons adapt to different screen sizes and devices. This is crucial for maintaining a consistent and user-friendly experience.
Regular Updates and Support: When choosing a button plugin, consider the plugin’s maintenance and support. Opt for plugins that are actively updated and have a reliable support system in case you encounter any issues.
Test and Preview: Before publishing or updating your content, always preview your buttons to ensure they look and function as expected on your website. Test them across various devices to verify their responsiveness.
Using WordPress button plugins for size control streamlines the process of creating and managing buttons on your website. These plugins are particularly beneficial for users who are not comfortable with coding or want a more visually-oriented way to customize button sizes. However, it’s essential to choose a reputable and well-maintained plugin to ensure compatibility with your WordPress version and avoid potential conflicts with other plugins or themes.
What are the best practices for accessible buttons?
Design and accessibility are crucial for ensuring that your website’s buttons are not only visually appealing but also accessible and user-friendly.
Prioritize Accessibility: Accessibility is a fundamental consideration when designing button sizes. Ensure that your buttons are accessible to all users, including those with disabilities. Follow the Web Content Accessibility Guidelines (WCAG) to make sure your buttons have adequate contrast, spacing, and size for users with different abilities.
Use Consistent Button Sizes: Maintain consistency in button sizes throughout your website. When buttons are of a consistent size and style, users can easily recognize them and know what to expect. Consistency also contributes to a cohesive and professional design.
Consider Fitts’s Law: Fitts’s Law states that the time to reach a target (such as a button) is a function of its size and distance from the user. Larger buttons are easier to click, so consider making important buttons, like call-to-action (CTA) buttons, larger to improve usability.
Mobile-Friendly Design: Buttons should be mobile-friendly and responsive. Given the prevalence of mobile device usage, it’s essential that buttons are appropriately sized for touch interactions. Ensure that buttons are not too small, making them difficult to tap accurately on smaller screens.
Provide Adequate Spacing: Buttons should have enough spacing around them to prevent accidental clicks and to make them easily distinguishable from other elements on the page. Proper padding and margins help users focus on the button and reduce errors.
Mindful Typography: Pay attention to the typography used on buttons. Ensure that the text is legible, and the font size is appropriate for the button’s size. Avoid using fonts that are too small or hard to read.
Hover and Active States: Design buttons with clear hover and active states. When users hover over a button or click it, there should be a visual change to indicate interactivity. This feedback helps users understand that they can interact with the button.
Use Visual Hierarchy: Implement a visual hierarchy to emphasize the importance of different buttons. For instance, CTA buttons should stand out more than secondary buttons. You can achieve this through variations in color, size, and styling.
Test Across Devices and Browsers: Test your button sizes and designs across various devices, browsers, and screen sizes to ensure they look and function consistently. Address any issues that may arise, such as buttons being too small or poorly positioned on certain devices.
A/B Testing: Consider conducting A/B testing to determine the most effective button sizes and designs for your specific audience and goals. A/B testing involves presenting different button designs to users and analyzing which ones perform better in terms of conversions or user engagement.
User Feedback: Collect user feedback to understand their preferences and pain points regarding button sizes and designs. User feedback can provide valuable insights for improving the user experience on your website.
Optimize for Touch and Click: Keep in mind that users may interact with your website using both touch and click inputs. Design buttons that work seamlessly for both touchscreens and traditional mouse inputs.
Conclusion
Button size in WordPress is a critical element of web design that impacts both aesthetics and user experience. By adhering to best practices for button size, considering accessibility, maintaining consistency, and conducting thorough testing, you can create buttons that not only look great but also enhance usability and engagement on your website. These practices contribute to a more inclusive and user-friendly online presence.
Editorial Process:
The reviews on this site are crafted through diligent research, collecting expert insights, and drawing from genuine, real-world experience. You can learn more about our editorial process here.
It’s worth noting that certain links within this article may be affiliate links. This means that if you choose to purchase a paid plan through these links, we may receive compensation at no extra cost to you. Rest assured, these are products and services that we have personally tested, used, and wholeheartedly endorse. We want to emphasize that our website is not intended to offer financial advice. Your trust and satisfaction are our top priorities.

